Wednesday, 2 October 2013

Bratislava: Chapter 3 ~ Bratislavský hrad (the Castle of Bratislava)

Hey my dear people! Yeah, these chapters started good, two in a row, and now it is almost a month since I posted them. Which essentially means I've been busy discovering the city, starting my classes (and trying to figure out the no-system system of the faculty), we even went for a wine festival near Bratislava, I shall write about it soon. But yeah ... I am enjoying Bratislava, the old town is simply a perfection, and I enjoy living on my own. :) 
Oh, I went to Ljubljana for the convention, it was GREAT. Got tons of compliments on my costume and make up as well, and I was really happy about that. :) And it was really good to see all my friends and family. Now I am not planning on going back to Slovenia until the end of my semester here, unless something urgent happens, and I am planning to travel around Slovakia a bit more, so I plan to make lots of chapters of it. :) Plus, I added the Slovak word of the chapter in the end of the posts, because I think the language is really fun and beautiful and I greatly enjoy learning it. :) I will add the Slovene word in the translation as well, just so you will see that not ALL words are the same in Slovak and Slovene. ;)

Chapter 3 will be about the Castle of Bratislava. It is very nicely visible if you come to Bratislava via Nový most, which, if I'm not mistaken, will happen if you take the highway to the city. The white building on the hill gives me an even stronger impression of Old Town being a bigger version of old town in Ljubljana (where we also have a white castle, but it is very small comparing to the one in Bratislava). Since old part of Ljubljana is one of my favourite places ever, let alone in Ljubljana, I certainly do not mind the bigger version of it. 

This is is written at the entrance to the castle, if you are interested in a bit of history:
The Bratislava Castle has been inhabited since the late Stone Age. Its first written record dates back to the year 907 AD. The Crown Tower, located in the southwest of the Palace, was built in 13th century and it is standing till today. During the reign of Sigismund of Luxemburg (1387-1437) the castle underwent a radical Gothic reconstruction. After 1526, the castle became the seat of Hungarian monarchs. Under the reign of Maria Teresa (1740-1780) the castle was transformed into a luxurious Baroque residence. In 1811, the castle was burnt down and its reconstruction was only undertaken in 1953. The Bratislava Castle is currently administered by the Chancellery of the National Council of the Slovak Republic and houses the Museum of History of the Slovak National Museum.

Of course you can walk up the hill to Bratislavský hrad, it is a rather short walk right from the Old Town and you can enjoy the view while you are walking up. On the path  (we took the one going from Obchodna, then Kapucinska and up the road) you can find lots of cafes, bars and restaurants, so if you're feeling like taking a break, you will have plenty of stops. :) 

The castle itself is gorgeous from outside. The surroundings are beautiful and the castle is quite magnificent (even if I prefer the old type of castles, ala Spiš castle), not to mention the view you have on Donau and the rest of Bratislava. But the insides disappointed me a bit. I do not know, perhaps they are still reconstructing the rooms, nothing was written explicitly. And although the museum and the gallery were very nice, I found the bare walls of the castle somewhat disappointing. But the first floor with golden arches and ceilings is fantastic. So yeah ... all in all I do recommend the visit. :) I paid 2,5€ with my student discount for the entrance.


 The stairs to the castle. Hey, if Frodo and Sam could walk up the freaking Cirith Ungol ...!


The view from the tower. You cannot open the windows there, so there might be a reflection from the glass here and there on the pictures.


And the ceiling inside the castle, love this!


I did not take a lot of pictures in museum and gallery, because my camera cannot work under the conditions of normal lightning in closed spaces. Ah. No matter, go see them for yourselves. :)


----
Slovak word of the chapter: čučoriedka [means blueberry (borovnica)]. The cutest word I have heard in my life. 
--------------

Thank you for reading and commenting!

Tuesday, 24 September 2013

Water decals on mint ~ Born Pretty Store review

Hey my dear people! Lots of stuff going on here, but today I had some time to finally do this review of the second product Born Pretty Store so kindly sent me and that I have shown it to you before. I think the store has done some changes with the page and it looks much more organised now to me, so that is great for the customer as well. If you are planning to do some shopping there (their nail art section is insanely vast and has basically everything), you can use my code to get 10% discount on your buy: SSL91

About the product of today's post: they are called 4pcs Nail Water Decals Stickers Black Stripe Ripple Triangle Moon Star Round (item ID: 5631) and are currently on sale for only 2,99$! They have 4 different sets of different patterns, I have chosen the sheet with patterns D196 to D199.

And quite honestly, I did not expect these to work. When I got them, I saw just how big they were and knew there was no chance getting them on my extremely short nails, I did not feel like trimming them and ruining the pattern, but they looked so wide and long I was like ... who can put this on their nails?? So I waited for my nails to get long (I need to do a post about my holy grail of saviours for nails) and figured it is time to try it somehow. I trimmed it a bit, because the shape of the start of the decal is completely useless in my opinion and then tried it, following the instructions.


The instructions are the same on every water decal, it was the same on butterflies.
As I started to put on the decals, I saw that my nails are still too short for the entire decal and that I have not trimmed it enough, they were too wide. I already saw a disaster waiting for a nail polish remover, but then I put the TC on and tried to remove the decal around the nail with a wooden stick. And it worked! Apparently top coat kind of melts the decal on the edges and so it is actually very easy to shape the decal according to your nail lenght. So all of the sudden this was by far the easiest nail art I have done in ages. The pattern is not complete, but I do not mind this, it looks like I have my nails covered in lace and everything is awesome when covered in lace. :)


This is after trimming, and on my longest nail. Your nails have to be REALLY long for these decals.


For all other advice, please check the Butterflies post, they are the same, just add the TC advice to it. :) My pictures are the best I could do in the Bratislava weather. I need to get my lightbox here from Ljubljana, I think I will need it. I am currently wearing Catrice Mint Me Up, that contains gold shimmer and it looks amazing with the water decal, I wish I could capture it.

I adore the final result, it looks awesome, I will definitively purchase these when I use them up. Plus, they take basically no time off you, they are perfect for those who are too impatient or not skilled enough for the stamping or freehand nail art. Love them! 

Here is my coupon again, if you want to buy the decals, I totally recommend them. :)


Have you ever tried the water decals? Did you like them?

Thank you for reading and commenting!

*Product sent for reviewing purposes, you can read my disclosure here.

Tuesday, 17 September 2013

How to Choose the Right Nail Polish Color (guest post)

Hey guys! I have a guest post for you today, the theme is How to pick the right nail colour. Honestly, I have had tons of troubles, picking a colour, many many times, since the choice in my stash is pretty big. First world problem, eh? ;)

***

How to Choose the Right Nail Polish Color
With the multitude of hues, shades, finishes and textures available at, and for your fingertips, choosing any one color, let alone one that suits your style can be daunting. I've spent far too many hours staring at the wall of nail lacquers, overwhelmed and unable to decide. With a little help, you can make the best choice for your nails in less time, so you get out of the cosmetics aisle and on to bigger and brighter things.

Detox Your Nails
Before you pick your polish, consider which nail lacquers contain a ton of scary and toxic chemicals that pose major health risks over time. While healthier options are not always readily available, when you can, try and buy brands that are free of formaldehyde, toluene and dibutyl phthalate (also known as DBP). Nontoxic brands are easy to find, even at your local drug store. Additionally, acetone, the nasty smelling ingredient in polish removers can cause respiratory problems and eye irritation. Non-acetone products are usually located beside acetone versions. Non-acetone products require a little more work, but your lungs will thank you!

Balancing Act
Whether you have a special event or are spending a day at work, you can make a chic statement by counter balancing the palate of your manicure with your outfit. Match a bright ensemble with neutral nails or a subdued one with a candy color. A classic example that easily transitions from day to night: pairing your black suit or little black dress with bright, super glossy nails will give you a stunning but subtle pop of color. You can pair your accessories to match, if you're feeling ambitious.

Monochrome Moxie
Although some experts and fashionistas advise against all over color coordination, there are occasions where matchy-matchy is the smart choice. Be perfectly paired by choosing a polish in the same color family, a shade darker or lighter than your outfit. The slight difference will create depth, while making you look entirely put together.

Go for Gold
Metallic shades add instant market value to your manicure, and because of the variety of metals to choose from, it's easy to find one that suits your skin tone. Consult your jewelry box to decide which sparkle makes you dazzle. If you tend to wear primarily silver, gold or even copper, stick with those tones on your nails, as they tend to be the most flattering for your skin. If you like sterling silver and turquoise, get funky and paint one nail to match that beautiful sea-toned stone.

Make your Mood
Feeling playful? Paint your nails in rainbow colors − a different color for each nail. Vampy and brooding? Try out a rich dark purple, deep red, chocolate brown or go all the way with daring blacks. Dark colors can make a powerful statement, but are best suited for short, very neat nails. Conversely, if you are feeling blue, pick out a sunny orange or yellow shade to chase away the rain cloud hanging over your head.

Ultimately, choosing the right nail color should be fun. Don't over think it! Be bold, and play around a bit. If you have time, take yourself on a date to the drugstore and sample the shades. Choose a few you know work well with your style and take a chance on one crazy color. Mix and match until you find what's best for your palate and skin tone. Follow these simple tips and your nails will be the envy of the salon.

Mimi Foster owns her own salon and loves to write articles on fashion, shopping, technology, and earning her project management degree online.

Sunday, 15 September 2013

Butterflies on nails pt. 1 ~ Born Pretty Store review

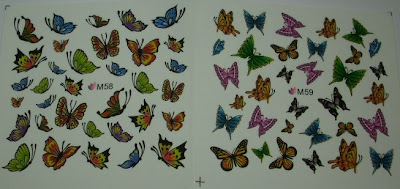
Hey guys. This review is long overdue. So let's get this show on the road. Born Pretty Store, as you all know, has all sorts of great products for all kinds of occasion, but I still think their offer in nail polish and nail art exceeds expectations, they have everything! In my latest review I got water decals as well, I chose the pattern of butterflies [4pcs Nail Water Decals Stickers Colorful Butterfly Flower Fruit, item ID: 5625], just because I prefer them over fruit and large flowers. 


You get one sheet of butterflies, divided in four squares, that indicate different sets or kinds of butterflies. They are different sizes as well. And well, that is basically it, you cut the butterflies you want on your mani, put them into water, wait a couple of seconds and put the butterfly on the nail. Never forget to peel off the protective layer of plastic, because that will ruin your water decal, it will not stick to the nail. Yes, I learned that the hard way, I just forgot all about it. 


Some observations:
  • The water decals are extremely easy to use. It takes like 30 seconds for the entire procedure.
  • It is best to use tweezers to pick up the decal after it separates from the paper.
  • Do not soak it for too long, if the butterfly floats from the paper entirely it is very hard to save it, since it scrolls up or around tweezers. 
  • The decals are not bothered by fast drying top coat, they do not wrinkle at all. In fact, I think the decal somewhat protects the polish so the mani lasts longer.
  • The large butterflies are really big, with my short nails they were basically too big for me to use them, so they can be used either on very wide nail or a long one. 
  • The foil of water decal is not just on the butterfly picture, keep that in mind, if you have shorter nails and trim the edges around the butterfly. 
  • The base colours should not be too dark or intense, or the butterflies will darken into a black shape. I like that, actually, but if you want to preserve the colours of butterflies, keep that in mind as well.
My first mani with them:


So yeah. I really liked this mani, I think it was cute. If you want to buy the water decals, they are on sale right now: click! Also, here is my code for 10% off at your purchase:


Thank you for reading and commenting!


*Product sent for reviewing purposes, you can read my disclosure here.